|
Bringing the blur back into focus...
还原模糊为清晰
Isn't it annoying when you take a set of photos, and many of them come back blurred? It's one of the most common problems photographers have, but one of the hardest to correct after the photograph has been taken!
当你拍摄了很多照片而其中的很多却是模糊的,这不是很让你苦恼么?这对摄影师来说是一个最普遍的问题,但是最困难的是怎样修复这些拍摄模糊的照片。
This tutorial will show you how to repair photo blur, and how to avoid it in the future.
这篇教程将向你展示如何修复模糊照片以及在将来如何避免拍出这样的照片。
The Basic Principle
基本原则
If you've used Photoshop or Photoshop Elements for a while now, you may have noticed two terms that walk hand in hand. 'Blurring' and 'Sharpening'.
如果你现在使用的是Photoshop 或 Photoshop Elements,你会注意到两个项目在一起――“模糊”和“锐化”。
Basically, sharpening an image is the opposite of blurring it. Photoshop Elements provides many different ways to sharpen an image.
一般说来,锐化图像是和模糊图像相反的过程。Photoshop Elements 提供了很多不同的方法来锐化一张图片。
To start with there's the 'Sharpen Tool', found near the bottom of your tool palette. This allows you to sharpen just a certain area of a picture, using an appropriate brush shape and size.
你可以在在工具栏底部找到“锐化工具”,它可以让你使用适当的笔刷形状和大小在一定范围内锐化一张图像。
If you're sharpening the whole image, you can use the filters in the 'Sharpen' category under the 'Filter' menu. These include 'Sharpen', 'Sharpen More', and 'Sharpen Edges'.
如果你要锐化整张图像,你可以使用滤镜菜单中的滤镜库中的滤镜,它们包括“锐化”、“进一步锐化”和“锐化边缘”。
Additionally to all of that, if you like to correct photos in 'Quick Fix' mode, there is a sharpen slider available in that section for you to use.
另外,如果你想在快速修复模式中修复图像,只有锐化滑块供你使用。
A 'Quick' Example
快速修复的例子
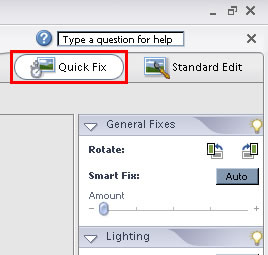
Shown further down is a portion of a photograph I took which exhibited minor blur. This is a correctable level of blur, and so I opened the photo in Photoshop Elements, and switched into 'Quick Fix' mode, using the button shown below:
下面展示的是我拍的有轻微模糊的部分照片(此句翻译不准确,不知道如何翻),这在模糊的修复的范围内,所以我在Photoshop Elements中打开照片,然后切换至快速修复模式,使用如下图所示的按钮:
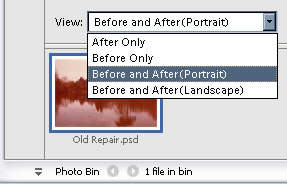
I always like to see the before and after picture in quick fix mode, and so I changed my view accordingly.
通常,我会观察在快速模式中处理前和处理后图片,因此我适时改变我的看法。
To do this, use the drop down box in the bottom left hand corner, and select 'Before and After (Portrait)', as shown below:
要做到这一点,使用左手边的下拉菜单,选择Before and After (Portrait),如下图所示:
The 'Sharpen' slider is the furthest one down on the right hand side by default. By dragging it around two thirds of the way along, I was able to reduce the blurring effect on my photo. Shown below is the photo before and after sharpening:
锐化滑块在默认的情况下在最右边,通过拖动滑块至2/3处,通常我就能够减少模糊对我照片的影响,下图就是锐化处理前和处理后:


As you can see, especially around the text on the sign, the blur has been reduced by sharpening the image.
正如你所见,尤其在标志上的文字部分,图像的模糊被锐化了。
出处:蓝色理想
责任编辑:bluehearts
上一页 下一页 修复模糊照片 [2]
◎进入论坛Photoshop、Fireworks版块参加讨论,我还想发表评论。
|


