由于在此篇教程中并没有涉及到国际化应用,应此我们并没有编写相应的资源文件!
struts-config.xml的源代码
<?xml version="1.0" encoding="UTF-8"?>
<!DOCTYPE struts-config PUBLIC "-//
Apache Software Foundation//DTD Struts Configuration 1.1//EN"
"http://jakarta.apache.org/struts/dtds/struts-config_1_1.dtd">
<struts-config>
<form-beans>
<form-bean name="lyForm" type="guestbook.maxuan.action.LyForm" />
</form-beans>
<action-mappings>
<action path="/lyList" type="guestbook.maxuan.action.LyListAction">
<forward name="success" path="/indexCnt.jsp" redirect="false" />
</action>
<action path="/saveLy" type="guestbook.maxuan.action.LySaveAction" name="lyForm" input="/ly.jsp"
scope="request">
<forward name="success" path="/index.jsp" redirect="true" />
</action>
<action path="/editLy" type="guestbook.maxuan.action.LyEditAction" name="lyForm" scope="request">
<forward name="success" path="/ly.jsp" redirect="false" />
</action>
</action-mappings>
<message-resources parameter="ApplicationResources" key="org.apache.struts.action.MESSAGE" />
</struts-config>
以上,我们完成了此次教程应用的struts-config.xml的编写,我们看到使用struts console工具编写Struts-config.xml是多么的轻松容易,如果用纯文本编辑工具来写一个大型的struts配置文件,我想恐怕是一个噩梦!
在完成了配置后,我们开始写JSP页面,首先我们定义template,它是struts的模板,所有相同的部份都可以使用template!
template.jsp的源代码
<%@ taglib uri='/WEB-INF/struts-template.tld' prefix='template' %>
<html>
<head>
<meta http-equiv="Content-Type" content="text/html; charset=GBK">
<title>留言本教程范例</title>
</head>
<body bgcolor="#ffffff" leftmargin="0" topmargin="0"
marginwidth="0" marginheight="0">
<template:get name='header'/>
<template:get name='content'/>
<template:get name='footer'/>
</body>
</html>
接着完成首页index.jsp文件,它的模板使用template.jsp,定义了页首(header.htm),页尾(footer.htm),及内容显示(由/lyList.do映射到indexCnt.jsp)
index.jsp的源代码
<%@ taglib uri='/WEB-INF/struts-template.tld' prefix='template' %>
<%@ taglib uri="/WEB-INF/struts-bean.tld" prefix="bean" %>
<template:insert template='/template.jsp'>
  <template:put name='header' content='/header.htm'/>
  <template:put name='content' content='/lyList.do'/>
  <template:put name='footer' content='/footer.htm'/>
</template:insert>
页首header.htm的代码(由于只是教程,我并没有进行页面美化工作,大家可以根据自己的喜爱自定义)
<table width="90%" height="50" border="0" align="center" cellpadding="0" cellspacing="0">
<tr>
<td align="center"><strong>留 言 本</strong></td>
</tr>
</table>
页尾footer.htm的源代码
<table width="90%" border="0" align="center" cellpadding="0" cellspacing="0">
<tr>
<td align="center">留言本教程范例 2003-9-21</td>
</tr>
</table>
留言内容显示indexCnt.jsp的源代码
<%@ taglib uri="/WEB-INF/struts-bean.tld" prefix="bean" %>
<%@ taglib uri="/WEB-INF/struts-html.tld" prefix="html" %>
<%@ taglib uri="/WEB-INF/struts-logic.tld" prefix="logic" %>
<jsp:useBean id="lyList" scope="session"
type="java.util.ArrayList"/>
<table width="90%" border="0" align="center" cellpadding="0" cellspacing="0">
<tr>
<td align="right"><html:link page="/editLy.do?action=Add">我要 留言</html:link> </td>
</tr>
</table>
<logic:iterate id="value" name="lyList" type="guestbook.maxuan.ejb.entity.value.BookValue"
indexId="index">
<table width="90%" border="0" align="center" cellpadding="5" cellspacing="2">
<tr>
<td><font size="4"><b><bean:write name="value" property="name"/></b></font><br>
Email:<a href='mailto:<bean:write name="value" property="email"/>'><bean:write name="value"
property="email"/></a>
| QQ:<bean:write name="value" property="qq"/> <br> 留言时间:<bean:write name="value"
property="posttime"/><br><br> <bean:write name="value" property="comment"/></td>
</tr>
<tr>
<td height="1"><hr size="1" noshade></td>
</tr>
</table>
</logic:iterate>
留言输入页面ly.jsp的源代码
<%@ taglib uri="/WEB-INF/struts-html.tld" prefix="html" %>
<%@ taglib uri="/WEB-INF/struts-bean.tld" prefix="bean" %>
<%@ taglib uri="/WEB-INF/struts-logic.tld" prefix="logic" %>
<html>
<head>
<title>留言</title>
<meta http-equiv="Content-Type"
content="text/html; charset=gb2312">
</head>
<body>
<table width="70%" border="1" align="center" cellpadding="2" cellspacing="2"
bordercolor="#000000">
<html:form action="/saveLy">
<tr>
<td width="21%" height="20">姓名</td>
<td width="79%" height="20"><html:text property="name" size="20"/></td>
</tr>
<tr>
<td height="20">email</td>
<td height="20"><html:text property="email" size="20"/></td>
</tr>
<tr>
<td height="20">qq</td>
<td height="20"><html:text property="qq" size="20"/></td>
</tr>
<tr>
<td height="20">留言内容</td>
<td height="20"><html:textarea property="comment" rows="5" cols="50"/></td>
</tr>
<tr align="center">
<td height="20" colspan="2"><html:submit>保存</html:submit> <html:reset>重置</html:reset></td>
</tr>
</html:form>
</table>
</body>
</html> 最后效果如图: 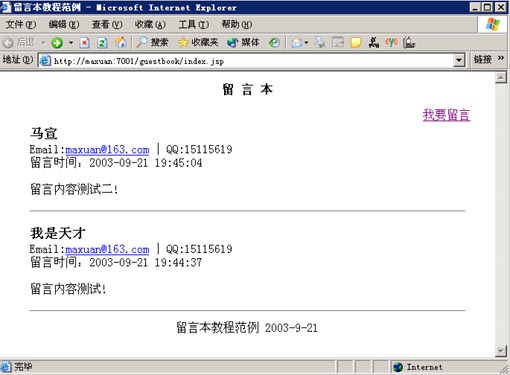
此时我们的j2ee体系的留言本教程也就告于段落! 从这篇教程我们可以窥见j2ee多层体系结构的端倪, 本篇教程只是一个基石,在此之上,你可以灵活地搭建更大型的应用, 这才是我写此文的最终目的! 后记:幻想曲花了30多分钟的时间从经典论坛中将maxuan9的帖子整理到了文档区, 希望对那些想学J2EE和正在学J2EE的朋友一点启示、一点帮助!
出处:蓝色理想
责任编辑:蓝色
上一页 [J2EE] 实战留言本 [8] 下一页 [J2EE] 实战留言本[补遗]
◎进入论坛网络编程版块参加讨论
|


